The Rhody Survivalist ~ Online Resources
Rhody Survivalist: Building a Bow and Arrow
For many this is the quintesential primitive skill. Perhaps because we all have this image of Native American's weilding Bows and Arrows in Hollywood cowboy movies. What is interesting is that humans of almost every culture around the globe eventually developed a projectile launching method that was the bow and arrow. It is interesting to theorize that humans had developed this technology before making their way around the globe, however, anthropological evidence suggests that much like friction fire, the bow and arrow evolved in several places at the same time. It is virtually impossible to know who developed the technology first. The first evidence of Bow and Arrow technology showed up about 35000 years ago. As humans hunted megafauna to extinction and focussed on smaller game, the Bow and Arrow was born. This allowed humans to hunt at a greater distance, greatly increase kill percentage, and allowed for multiple shots on game.
I have built alone or with a group 6 completed bows and about 6 incomplete bows. This in no way makes me an expert. I think bow building in group is a great way to learn as you can see the successes and failures and learn from many others. My favorite school for learning to build a bow is ROOTS school in VT. Their 10 day bow building/flint knapping / arrow making course is fantastic. They are experts in bow building. Here, I am only giving a quick presentation on what it takes to build a bow.
Finally, a note about primitive bow building. If you decide to build a bow using modern power tools and metal tools, a bow can be accomplished in 8 - 40 hrs. If you decide to build a bow using stone tools only, the build time increases to as much as 400 hrs. Primitive society bowmakers were probably making bows in around 200 hours (this is my estimate only, lets just say that it took a long time). Primitive bows were passed down from generation to generation. A well cared for bow can last for hundreds of years. Bows were incredibly valuable and said to be worth as much as a good horse. That being said, there are a lot of nuances to bow building, most of which can be experienced using modern tools. If you feel the need to learn to build a bow using stone tools I commend you. There is nothing cooler than that. However, I would reccomend a realistic goal when starting out is to build your bow using mostly modern metall hand tools with maybe a little bandsaw work mixed in. Once you have executed a few bows, then maybe you want to take the deep plunge into the world of stone tools.
Building a Self Bow:
The Stave:
A bow's life starts as a stave. A stave is split from a tree 8-16" in diameter. Check out this page to see Osage Staves being split: http://www.buildyourownbow.com/splitting-an-osage-log-into-bow-staves/
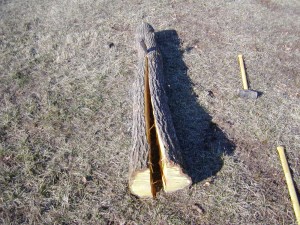
From buildyourownbow.com, a log being split into a stave.
A stave should be made from a section of tree, as straight as possible with few knots and branches, and no bugs. Dead standing us usually not good, however, sometimes these are the trees that surprise you. Trees harvested in the Fall to Early Winter when the sap is down will dry out the fastest and are less likely to check when drying. When cutting a tree, cut to 7 foot lengths and then let sit under cover to even out moisture for 3 months. The slower the dry, the better. After 3 months split the wood as shown above into staves (split at the checks if some have appeared). Splitting is better than cutting because it will split with the grain. This is very impotant in wavy grained wood such as Osage. Once split, paint the ends and let sit for at least a year. Personally, I like to store the wood as it grows, upright, but everyone has their own opinion. You may need to oil the stave to keep it from drying too fast. Keep it indoors if possible away from heat and out of the sun. A dry basement is good. A hot garage may not be so good. Final moisture content should be 8-10%
Bows have successfully been made out of every hardwood. The best woods are: Osage, Locust, Hickory, Elm, and Ash. Of these Osage and Locust are considered prime. Hickory and Elm are considered very good. Ash is not always reccomended because defects may not become apparent until the final stages of constuction (after 40 hours of labor). At Tracker, our group ash bow broke on the final tiller. Luck can be a factor. In Rhode island we have a lot of Locust and Hickory, both fine choices for bow wood. Other possible woods would be Sugar Maple, Chestnut, White Oak, Paper Birch, and Sycamore. Local woods to avoid would include Grey Birch, Red Oak, and Red Maple. I personally would avoid Cherry based on it's crabbiness and movement when drying. However, a lucky bowyer could make one beauty of a bow out of Cherry. I've also heard of Maple bows shattering dangerously so maybe that should be considered a more advanced wood as well. I also can't think of a reason Walnut wouldn't be a great wood to use but have not seen it done.
Here we are going to focus on building an Osage bow. Osage is certainly not the easiest wood to work with but it makes a beautiful bow with lots of character.
Determine your Draw Length:
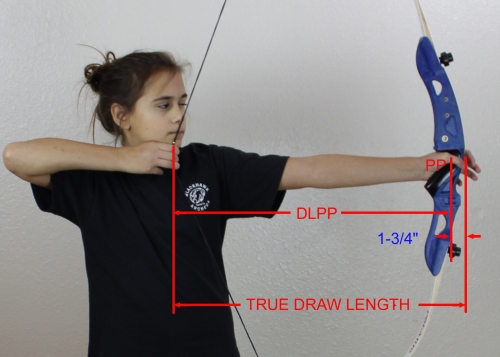
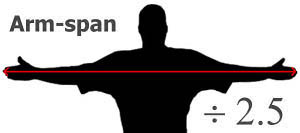
Have someone help you by drawing a bow (as shown above) and measure from your thumb knucle on the bow hand to your finger knuckles on the string hand. This is your draw length. Some smart people also determine it like this:
Now determine your bow length:
(Draw Length x 2) + 7 = x
Bow Length = x(.05)+x
My Draw Lenght is 28" so for me this would be (28x2)+7=63 so Bow Length = 63(.05)+63=66.15"
I like to cut the stave to this length leaving an extra inch or two on each end.
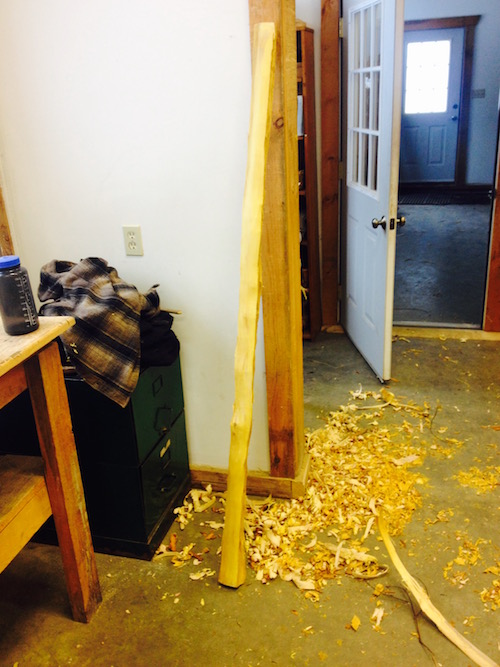
Begin to Work the Stave:
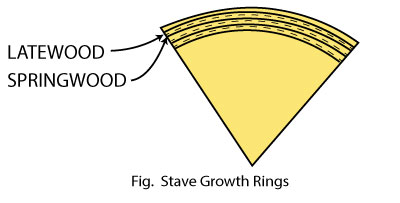
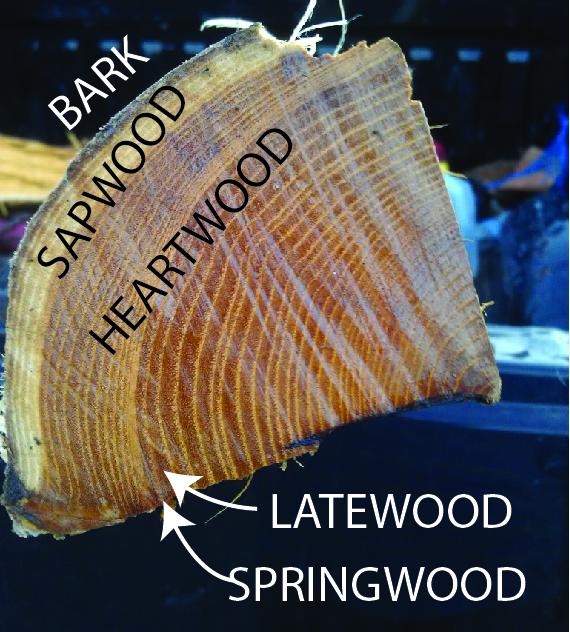
Look at your stave from the end. You will notice it looks a bit like a pie slice. You can planely see three distinct regions:
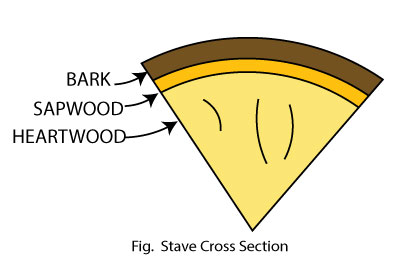
For an Osage bow the goal is to remove the bark and the sapwood and as many growth rings into the heartwood as you need too until you have one complete growth ring down the back of the bow.
The bark and sapwood can quickly be removed with a drawknife. A somewhat dull drawknife actually works a little bit better. Carve down untill you find the transition between soft sapwood and hard heartwood and ride that transition all the way down your stave. This process shouldn't take long. You don't have to be too carful at this point however, if you go crazy with the drawknife and gouge down into several growth rings the next step will be a lot more difficult. Also note that if you are working a Hickory stave you just need to remove the bark, keep the sapwood on Hickory.
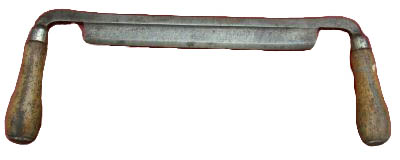
The Drawknife: The perfect tool for peeling away bark and sapwood
Now comes the part that requires a bit of finesse. You need to take the entire back of the bow to a growth ring. On osage this ring may undulate substantially. This step needs to be performed carefully with a cabinet scrapper. As this ring is one of the primary structural components of the bow when flexed you CANNOT violate the growth ring. If you do you need to set the new growth ring as your new baseline and scrape the entire back again. The goal is to have one single growth ring visible on the entire back of the bow. Note that on Hickory you only need to take the Bark off and you are at a ring. Dried Hickory bark can be a little clingy so care needs to be taken not to violate that outer Sapwood ring. I've read that with hickory staves sometimes it is easier to take the bark off the log when it is fresh and then oil the entire stave to control drying.
A picture from http://tradgang.com/ showing the emergence of a growth ring (dark area in middle).
It's hard to find pictures of a ring emerging but the one above is pretty good. Many people I know prefer to find their ring in the middle and work out from there. Once you have exposed your ring you carefully want to follow it to both ends. Use a Cabinet Scrapper to do this. Some people use knives, I'm not sure why, the scraper is the way to go. You will want to get a full set of scrapers and file and tool steel to sharpen them. Leave little islands around knots and pits to come back to when you have the ring fully exposed. Really big knots can be left with a ring island on top. It is better to have little bits of a ring on top of the main ring than to violate it.

The Cabinet Scraper: The perfect tool for finding that ring.
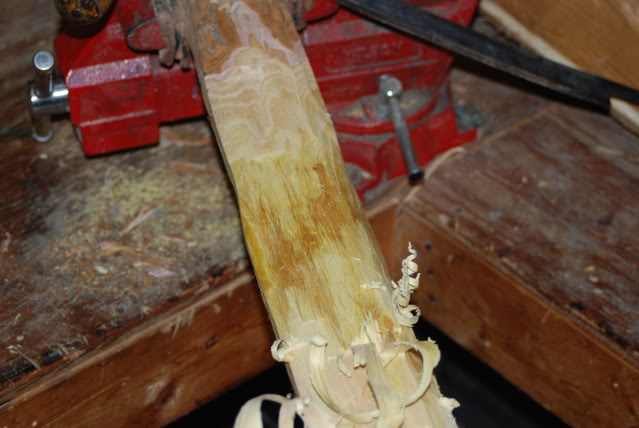
To a Ring: My Bow stave at ROOTS scrapped to a ring. While at first a bit nerve-wracking, scrapping to a ring becomes one of the most enjoyabe parts of making a bow.
Layout Your Bow:
Now you have a nice clean surface you can lay out your bow in pencil on the back of your stave. Start with a centerline. With a Hickory bow this can be done by simply snaping a chalk line down the center of your stave. With Osage it is a little more complicated. You want to follow the grain of the wood which is probably rather snakey. Basically draw a centerline (guessing the best you can where to start) free-hand the length of the stave following the grain of the wood. Then use the same dimensions as shown in the layout drawing but measure off the centerline.
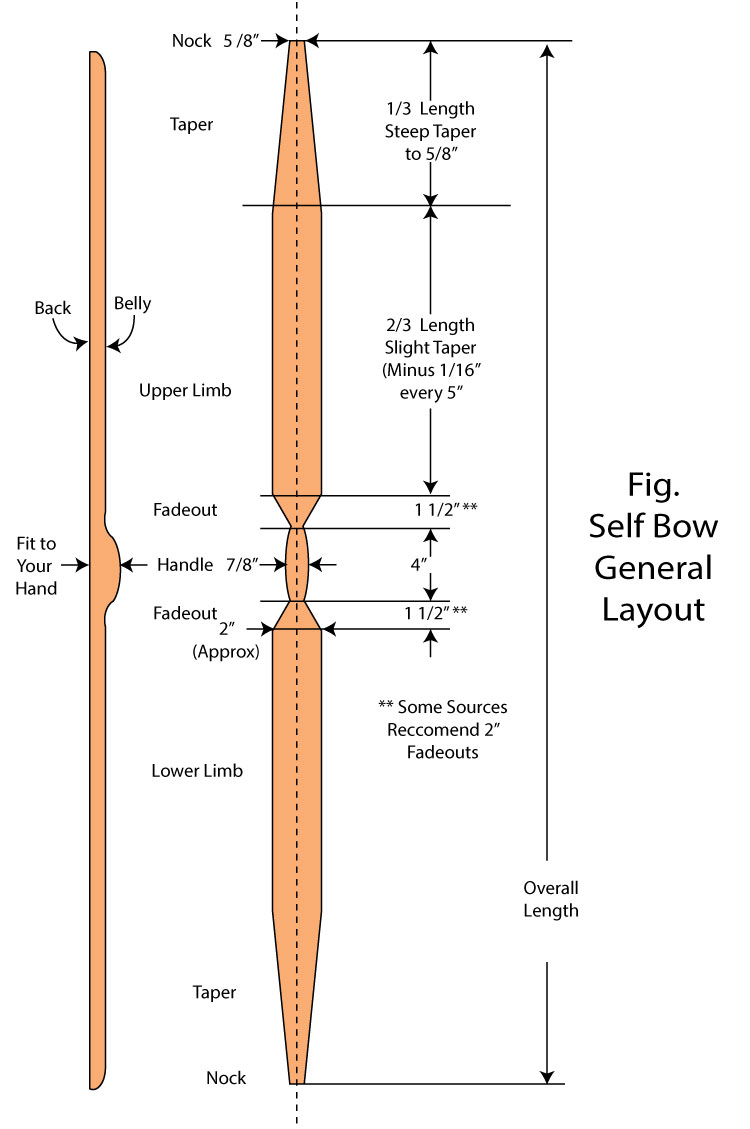
The basic bow layout. If you are making a hickory bow snap a chalk line down the middle and put this shape on your bow. With Osage you need to follow the grain of the wood with your layout. See pictures below.
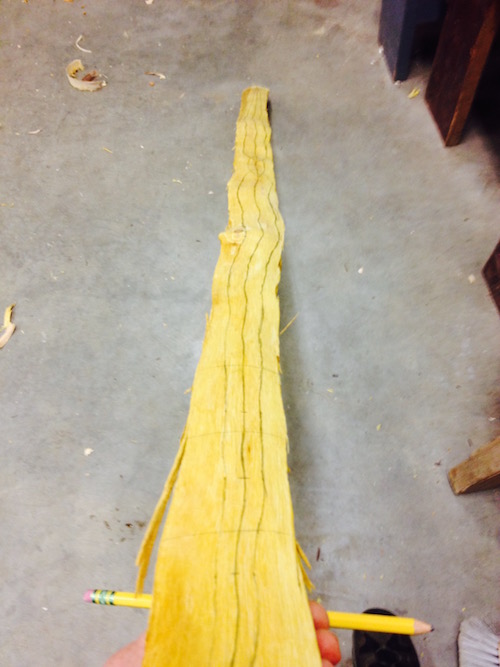
Layout on an Osage bow following the grain of the wood
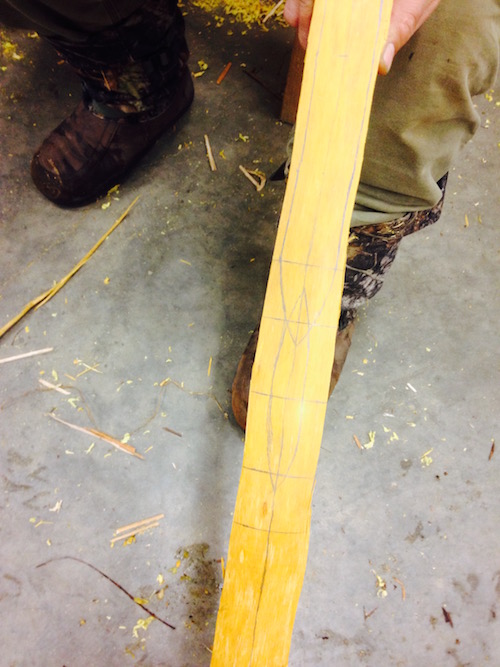
Laying out the handle on an Osage bow.
Now you can cut out the shape of your bow. You can do this with a large rasp which takes a lot of time, or you can do it with a bandsaw. While the bandsaw is faster and much easier, take some time to get used to using your bandsaw before you attack your stave. At this point you have at least a couple of hours into your bow and you don't want to waste all of that on a bandsaw oops. It is real easy to take too much material with the bandsaw. Be careful and cut slowly. Also remember that Osage has a super high silica content which means it dulls tools very quickly, especially non-carbide tipped bandsaw blades.
Start by putting the stave on it's side and cutting the belly. You want to leave a 1/2" to 3/4" thickness on both limbs. (Start with 3/4 to be safe). Follow your fadeouts to about 2" at the handle. This will leave you a lot of material to remove later with a rasp but again better safe than sorry.
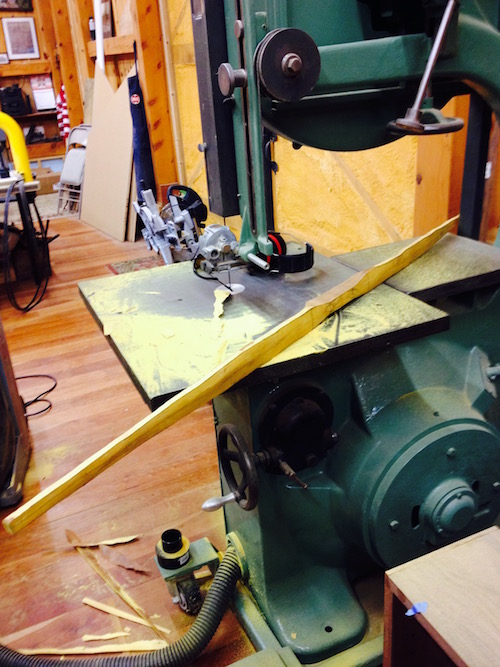
Cutout the belly first.
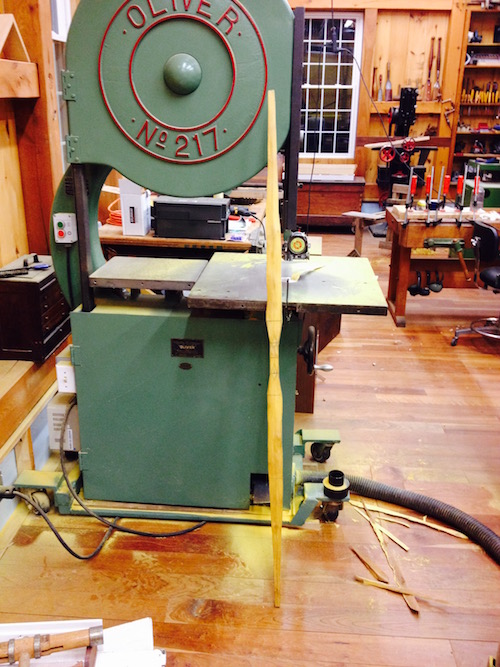
Cutout the outline of the bow next.
Tillering the Bow:
This is the part where you start to bend your bow. The first thing you want is for your bow to bend evenly. An uneven bow will be difficult and uncomfortable to shoot. A perfect tiller looks a bit like this:
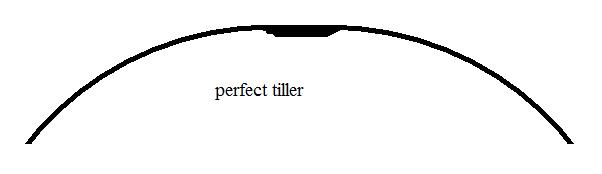
From poorfolkbows.com: A perfect tiller shape.
So how do we get there? This is where Rasps become your friend. The two rasps you should get are a Ferriers Rasp for taking downs some serious material and Nicholson Pattern Makers Rasp.

![]()
A quick note about the Pattern Makers Rasps. Nicholson used to make these in the USA and they were awesome. The new ones are made in Brazil and they are not nearly the quality. They don't cut as well and are not as durable. If you can find one of the older USA rasps,...buy it!
Start with your ferriers rasp and take some material off of your the belly of your bow. The BELLY NOT THE BACK!! From this point on you don't want to touch the back. Flatten the belly of the limbs evenly to a pencil line of 1/2 - 3/4 inch from the back and follow it. The idea is to get the bow to a point where it is just starting to bend when floor tillering.

From poorfolksbows.com: How to floor tiller.
Once you have the bow taken down to your lines and it is just starting to bend you want to change over to your Cabinet Makers Rasp. This cleans up the deep gauges and now you can hone in on the draw weight that you want. Draw weight is the pounds it takes to draw the the bow to full draw. Weight can always be taken off but never added. It is smart to aim for a higher weight than you may initially be comfortable with. To hunt deer in RI, the draw weight of the bow must be a least 50lbs. 50 lbs on a self bow is really 50lbs and is a lot of weight to pull (In contrast to compound bows and recurve bows that actually reduce the pull weight at full draw). However, you can get used to comfortably shooting 50 lbs with some conditioning. Another thing to note is that a bow will probably loose a little bit of weight as you break it in. In other words, the fibers may give a little and a bow that you worked really hard to make exactly 50lbs may actually be closer to 47 pounds and below the legal limit to hunt deer. So if hunting deer is your objective, maybe shoot for making a 60lb bow. Once the bow is there and broken in you can take a few scrapes off of each limb to drop it a couple of pounds if you wish. If you are lucky, you will have a 55lb bow when you are finished.
Now, cool bow builder types can fully tiller a bow just by floor tillering. For most of the rest of us when we get close you will want a tillering stick.
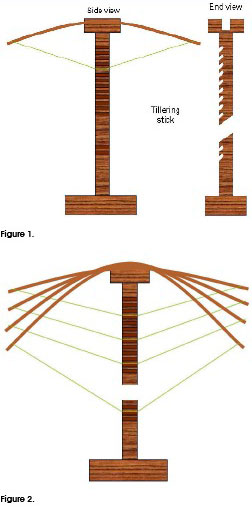
From Africanarcher.com, a tillering stick
A tilleringstick allows you to step back and observe from a distance how a bow is bending. You will want to make sure both limbs are bending evenly, uniformly and without any hinges or transitions. On a Hickory bow this is easy, with Osage sometimes it is tricky and you will have to view the bow from several directions to asses the bend.
Adding the Nocks:
Of course you will need to add nocks and a string before you can use a tillering stick so lets start with the nocks:
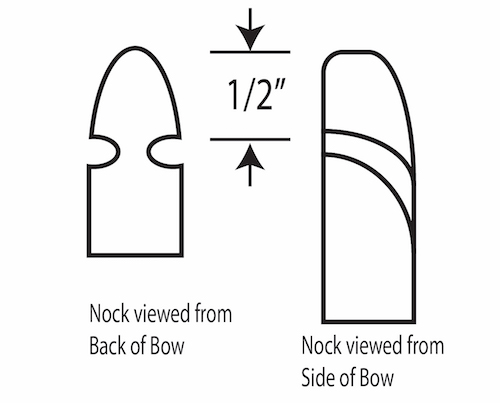
Nocks can be carved with round nock groove files. Layour the lines as shown above and carefully carve out the grooves with your file. Finish by softening up any rough edges.
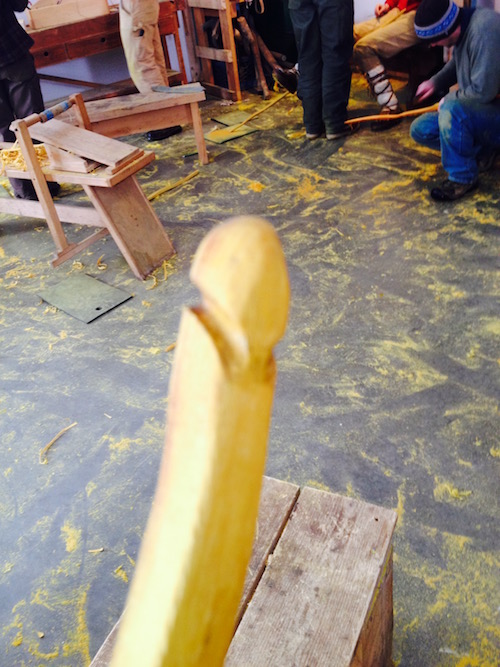
The picture above of my ROOTS bow shows a proper nock. Notice that the grooves follow where the string would naturally track under tension.
Non-Primitive Bow Strings:
I've never used a primitive string. I buy dacron b-50 string on spools. This lecture does not address primitive strings. Its easiest here to use two different colors of bowstring. You want a flemish knot at one end of your string. This article is a good description of how to make an easy bowstring:
http://www.stickbow.com/stickbow/features/flemishstring/flemishstring.html
Final Tiller:
Ok, you are almost at the weight you want, you have a string set in the nocks. Your bow is bending easily, you put in on the scale and pull back 60 lbs. Take your card scrapper and scrape each limb 5 times and measure again. Do this slowly and work your way down to the weight you want. 5 scapes can be the difference between a 55# bow and a 49# bow. As the limbs get thinner the scrapper takes a larger % of weight. As you get close it doesn't take much so go slow and be careful!
Finishing the Bow:
Bow finish should be tung oil. Real tung oil without any dryers is better. 10-12 coats total should do it. You should re-oil from time to time. Store your bow unstrung in away from any source of heat or direct sunlight. It should last the rest of your life.
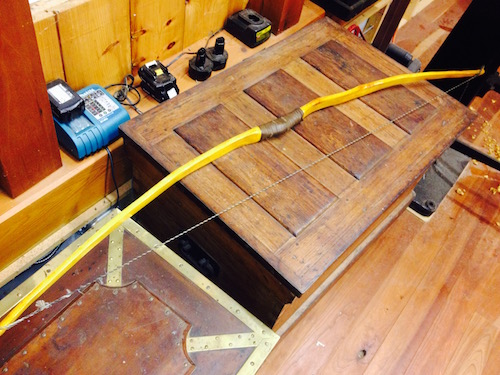
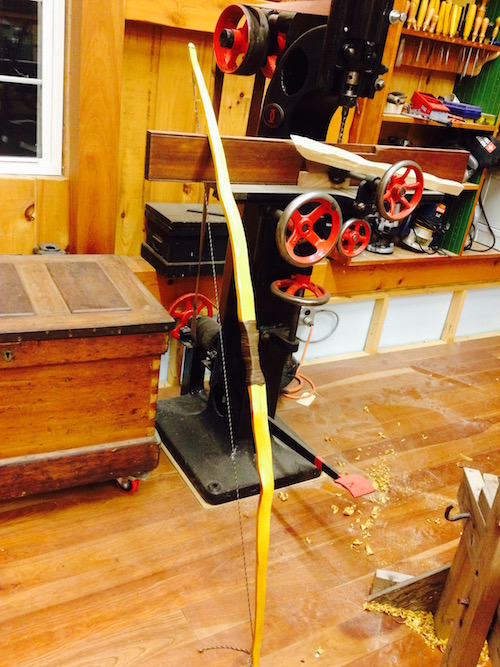
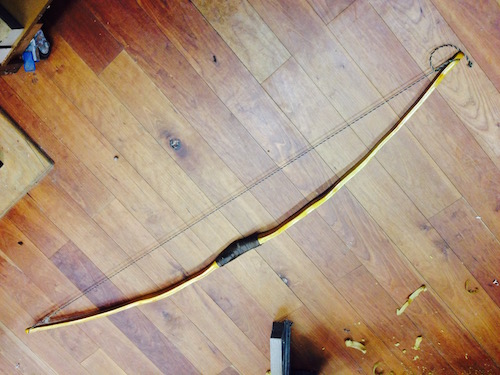
Some pictures of my finished Osage Bow
Primitive Arrows:
At ROOTS they taught us that you can kill an animal with a crappy bow. You can't kill an animal with a crappy arrow. Arrows are a lot of fun to make. It is acually amazing how forgiving arrow materials can be.
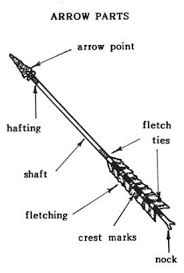
The basic parts of an arrow are the shaft, the point, the fletch and the nock. All are super important.
The Shaft:
Shaft wood is prentiful in Rhode Island. The best are Arrowwood (guess where it's name comes from), Highbush Cranberry, and Highbush Blueberry. If you are more monkey than human (like me) you may have a problem finding blueberry of adequate length. Highbush Cranberry is usually planted in RI so harvest it at night when the bush owners won't see you. The go-to local wood is Arrowwood, a Vibernum, it grows everytwhere in RI. Click Here to Learn How to ID Arrowwood. Other great woods that are still considered primitive are rivercane and bamboo. Bamboo is probably the best of all. If you have access to it, use it. Sometimes home centers sell bamboo snow stakes or landscaping stakes that are perfect and about $1 each (these are often dyed green).
For harvesting from Arrowwood or Cranberry, look near the core of the shrub or on the branch tops for shoots that extend straight for the sky. Sometimes you have to get into the shrub to find the mother lode of fast growing shoots trying to find a bit of sunlight. Look for shoots with no kinks, no knots, no bug damage, and of adequate length. I have found in the last few years that you can encourage nice shafts in your favorite shrubs with some selective pruning. You can even encourage shoots to form by cutting the shoots and leaving the copus. 2-4 shoots will emerge the following year.
Now, for adequete length you want arrows that are 2-3" longer than your draw length. This is IMPORTANT! If you draw back an arrow that is too short there is a good chance it will fall off your platform and wind up IN YOUR HAND. That's bad. At this point I should mention that you should always be super careful using other people's archery equipment, especially if you have monkey arms.
Now to straighten the shaft I like to hang the shafts as they grow and once a day or once a week bend them straight as they dry. This could take a few months.
Once dry scrape off the bark and smooth out anything that might take a chunk out of your hand. If the shaft needs further straightening oil it or rub it down with fat. Next hold it real close to a fire. Once it is almost too hot to touch give it a little bend. You will feel it give. Once it cools down the wood will permanently take a this set. (This is also how recurve bows are made).
My problem was I liked to go big. Arrows need to flex when you shoot them. That flex is based on the weight of your bow. This can be trickey but once you shoot a proper arrow, you will know right away of the spine weight of your arrow is too light.
What's the Point?
Most of the time we think of arrows with a point, or an arrowhead. These can be made of Bone or Stone. Not all states allow primitive arrowheads and almost all that do have specific dimensions required.
In Rhode Island to hunt deer: Arrows must be broadhead, with at least two cutting edges seven eighths inches (7/8") or greater at the widest point. When I asked a DEM official if primitive points were allowed he said as long as they meet the above criterion and have no barbs.
An arrowhead should be 2.5-3 times longer than it is wide. So if your arrow is 7/8" wide it should be roughky 2.5 + inches long.
Bone arrowheads are super effective and much easier to make than a knapped point (unless you are proficient at knapping). Green bone is easier to work with but must be fire hardened before use. (be gentle fire hardening bone there is a fine line between hard and brittle). Bones that have been cooked, boiled, or baked such as a ham bone are no good, you need fresh bone.
Arrow designs vary wildly. I would start with a piece of bone and a rough idea of what you want it to look like and then see what the bone wants to do. Sometimes design oportunities reveal themselves later on. The arrow should be concave in the middle for easy hafting with hafting notches on either side. Many primitive archers have gotten in trouble for havting notches being considered barbs so be careful.
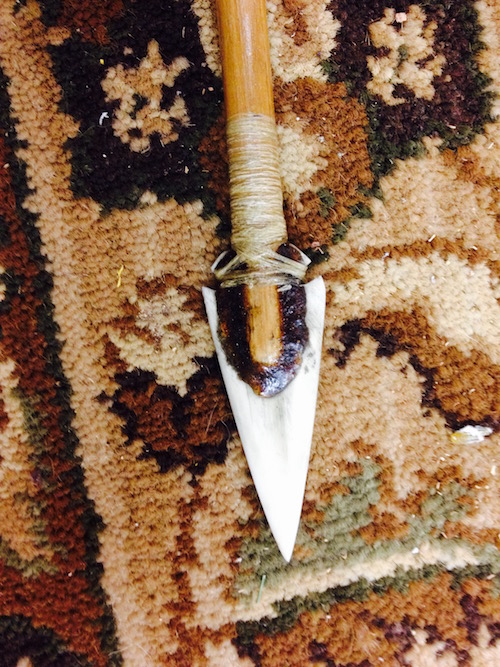
Now round over and cut a notche in the tip of your arrow. The arrow should be snug but not too tight. Use some pine pitch mixed with rabbit poop as glue and glue the point to your arrow. Haft with deer sinew. Soak the sinew in your mouth, this activates the natural hide glue. Haft as shown in the picture above. Use the pitch glue to make the transition from the arrow point to the shaft as smooth as possible. Use some hide glue to cover and seal the whole joint when you are done. Now is a good time to mention that this arrow is not waterproof. Water will weaken the structure considerably.
Flintknapping arrowheads is a whole other topic and we will skip that here.
Now, if you are hunting rabbits, squirrels, racoons, most birds and other small game you will most likely be hunting with blunt arrows, not points.
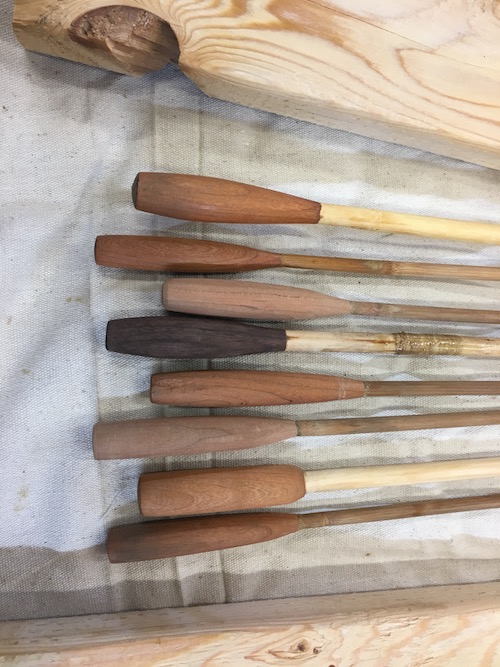
Some of the many blunts I have made.
Making the blunts is easy. Take a piece of scrap hardwood, drill a hole the diameter of your arrow shaft and glue it on. Once it is dry you can carve, grind and sand it to shape. I find this is a great activity for stone tools. It is relaxing and theraputic. I'm not sure why but I find making blunts to be incredibly satifying. As I have made and shot more blunts I notice that I am making the heads smaller and more streamlined. You want some mass but it doesn't have to be too great. Too much mass will increase the paradox and require a thicker shaft which slows down the arrow substantially and affects accuracy. I believe that there is a point where the increased arrow velocity more that makes up for the loss of mass and becomes incredibly devastating to the animal it hits.
The Fletching:
The fletching is usually made from feathers. The purpose is to add a bit of drag to the back of the arrow and create a little spin. Both of these functions increase accuracy. In an emergency or survival situation you can use long pine needles. Here, we will discuss feathers.
Feathers should be stiff and large, Primary and Tail feathers. Remember that possesing Raptor feathers is illegal in 50 states. Game birds only. Turkey feathers are the best. I have tried to use seabird feathers found at the beach with little success. You will need three feathers for your arrow. It is important to get them from the same side of the bird so that helical arc is in the same direction.
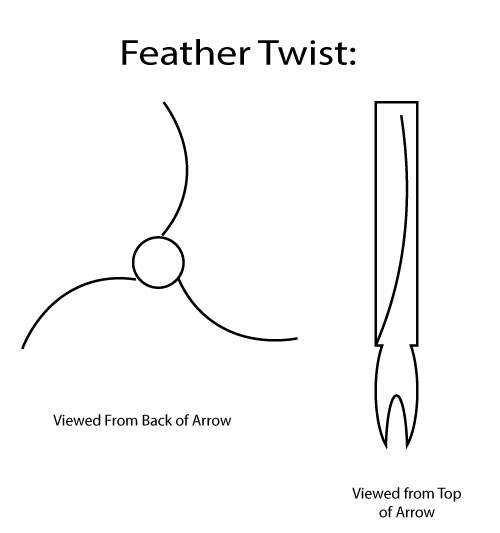
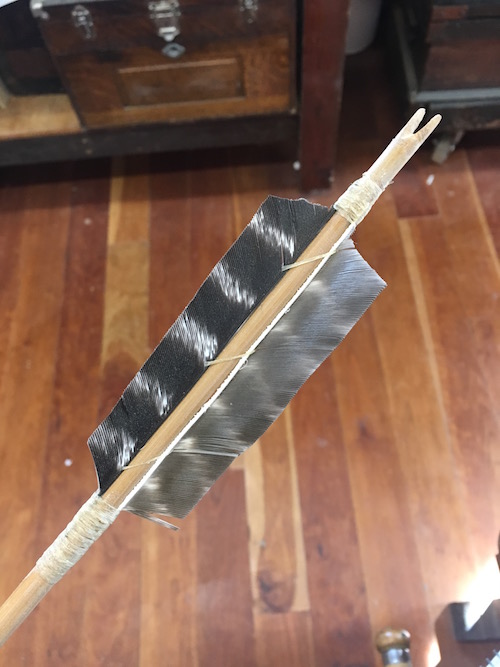
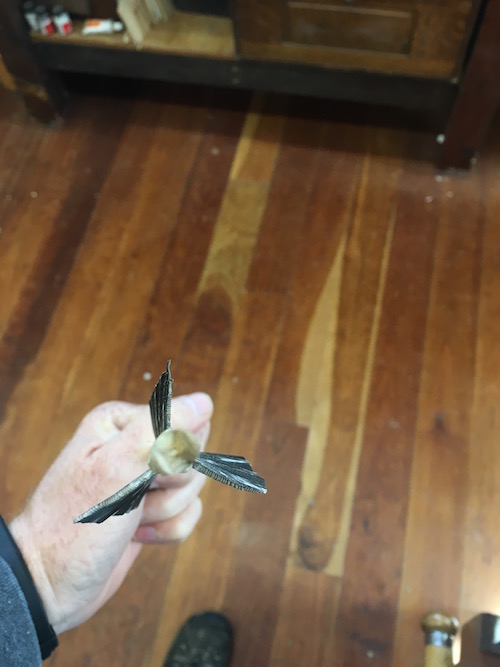
Strip a the feathers and allow a place to tie on sinew in front of and behind the feathers. Tie on the front of the feathers with a piece of sinew in the position you want. Get as long a string of sinew as you can and work it radially with the feathers, repositioning the feathers as necessary. Tie another piece on the back to secure the feathers in place. Use Sinew to smooth out any "Bumps". Again use some hide glue to really hold everything together. Once tied on you can trim your feathers. They should all match. I trim mine the way shown.
Nocking:
Lots of store bought arrows have one Odd fletch. That fletch marks the fletching that touches your cheek. This leaves a clear patch when you launch the arrow so feathers don't rub against the bow..... in theory.
So you want one feather to be perpedicular to the nock.

This is accomplished with that cool little nocking file we used on the bow earlier. Now, this is a struggle for me. I always start off in the right spot but end up with my knock a little off of where it should be. Sometimes it comes out good and sometimes it doesn't. It seems this is a common struggle even with experienced arrow makers. When I once asked an expert bowyer how he avoids this he said: "I don't know. Some things in life are just hard." You can smooth out the bow string landings in your knock so a braced bowstring has a path to follow (see photo above). If you have the thickness in your arrow shaft you can also make finger landings that you can grip the arrow with.
The Quiver:
So we have a bow, we have some arrows. We are almost ready to go hunt except we need a quiver. Here I must admit that I have never huned deer. I still don't feel that I am ready. I have hunted small game. The quiver should carry up to 12 arrows and a throwing stick. If you hunt with blunts there may be times you need the throwing stick to finish off a wounded animal. You may not have time to find a stick so keeping a throwing stick in your quiver is a good idea. The quiver should be long enough to carry all your arrows with the fletching exposed. You should be able to reach back and grab an arrow easily as well as "unhook" and point your fletchings backwards for getting through the thick brush. I keep all my primitive arrows stored in a primitive quiver.
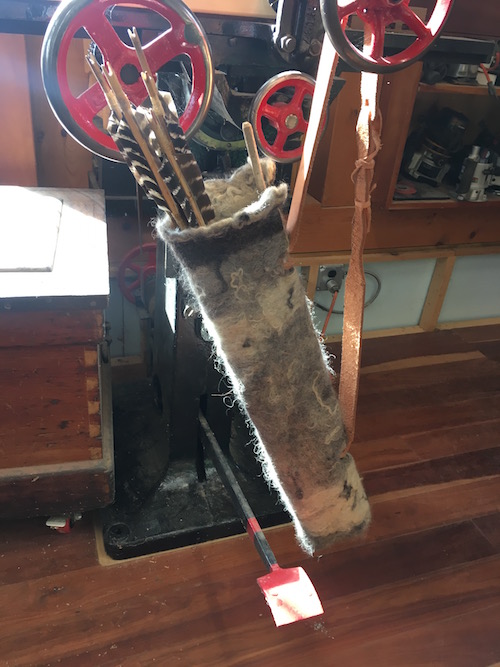
This quiver was made by felting wool. I think that may have to be a topic for another article.
Hunting with a Primitive Kit:
I'm no expert hunter. In fact, I really hate killing animals. That being said, there is a certain right of passage associated with the hunt. Human beings are predators, it is in our DNA. There are several schools of thought on the ethics of hunting. I personally believe that it is an essential part of the human experience that connects us to our not so distant past. Hunting is real connection with nature on a visceral level that cannot be experienced indirectly. There is something so real about the experience that it cannot be described with words. I also believe that modern hunting methods have stripped much of this experience away. Hunting an animal or catching a fish with tools you made with your own hands with materials you gathered from the landscape is the ultimate connection with the Earth.
So once again this warning: Go ahead and practice primitive skills. Learn about them and you will see the world in a whole new way. Sharper and Brighted but also Darker and more Depressing. If you choose to go down this road you will feel first hand the toll that humans have taken on this planet. You will no longer be able to turn a blind eye to it and live in oblivious happiness. I think that is is worth it. To really experience the Earth you must really get into it. The rewards far outweigh the burden. Maybe if enough of us choose to really see, we can fix all of this before it is too late.

My first Primitive Kill. A Red Squirrel on the Origins trip at ROOTS
Resources: